Table of Contents
When using MySQL you may need to ensure the availability or scalability of your MySQL installation. Availability refers to the ability to cope with, and if necessary recover from, failures on the host, including failures of MySQL, the operating system, or the hardware. Scalability refers to the ability to spread the load of your application queries across multiple MySQL servers. As your application and usage increases, you may need to spread the queries for the application across multiple servers to improve response times.
There are a number of solutions available for solving issues of availability and scalability. The two primary solutions supported by MySQL are MySQL Replication and MySQL Cluster. Further options are available using third-party solutions such as DRBD (Distributed Replicated Block Device) and Heartbeat, and more complex scenarios can be solved through a combination of these technologies. These tools work in different ways:
MySQL Replication enables statements and data from one MySQL server instance to be replicated to another MySQL server instance. Without using more complex setups, data can only be replicated from a single master server to any number of slaves. The replication is asynchronous, so the synchronization does not take place in real time, and there is no guarantee that data from the master will have been replicated to the slaves.
Advantages
MySQL Replication is available on all platforms supported by MySQL, and since it isn't operating system-specific it can operate across different platforms.
Replication is asynchronous and can be stopped and restarted at any time, making it suitable for replicating over slower links, partial links and even across geographical boundaries.
Data can be replicated from one master to any number of slaves, making replication suitable in environments with heavy reads, but light writes (for example, many web applications), by spreading the load across multiple slaves.
Disadvantages
Data can only be written to the master. In advanced configurations, though, you can set up a multiple-master configuration where the data is replicated around a ring configuration.
There is no guarantee that data on master and slaves will be consistent at a given point in time. Because replication is asynchronous there may be a small delay between data being written to the master and it being available on the slaves. This can cause problems in applications where a write to the master must be available for a read on the slaves (for example a web application).
Recommended uses
Scale-out solutions that require a large number of reads but fewer writes (for example, web serving).
Logging/data analysis of live data. By replicating live data to a slave you can perform queries on the slave without affecting the operation of the master.
Online backup (availability), where you need an active copy of the data available. You need to combine this with other tools, such as custom scripts or Heartbeat. However, because of the asynchronous architecture, the data may be incomplete.
Offline backup. You can use replication to keep a copy of the data. By replicating the data to a slave, you take the slave down and get a reliable snapshot of the data (without MySQL running), then restart MySQL and replication to catch up. The master (and any other slaves) can be kept running during this period.
For information on setting up and configuring replication, see Chapter 15, Replication.
MySQL Cluster is a synchronous solution that enables multiple MySQL instances to share database information. Unlike replication, data in a cluster can be read from or written to any node within the cluster, and information will be distributed to the other nodes.
Advantages
Offers multiple read and write nodes for data storage.
Provides automatic failover between nodes. Only transaction information for the active node being used is lost in the event of a failure.
Data on nodes is instantaneously distributed to the other data nodes.
Disadvantages
Available on a limited range of platforms.
Nodes within a cluster should be connected via a LAN; geographically separate nodes are not supported. However, you can replicate from one cluster to another using MySQL Replication, although the replication in this case is still asynchronous.
Recommended uses
Applications that need very high availability, such as telecoms and banking.
Applications that require an equal or higher number of writes compared to reads.
For information on MySQL Cluster, see Chapter 16, MySQL Cluster.
DRBD (Distributed Replicated Block Device) is a third-party solution from Linbit supported only on Linux. DRBD creates a virtual block device (which is associated with an underlying physical block device) that can be replicated from the primary server to a secondary server. You create a filesystem on the virtual block device, and this information is then replicated, at the block level, to the secondary server.
Because the block device, not the data you are storing on it, is being replicated the validity of the information is more reliable than with data-only replication solutions. DRBD can also ensure data integrity by only returning from a write operation on the primary server when the data has been written to the underlying physical block device on both the primary and secondary servers.
Advantages
Provides high availability and data integrity across two servers in the event of hardware or system failure.
Ensures data integrity by enforcing write consistency on the primary and secondary nodes.
Disadvantages
Only provides a method for duplicating data across the nodes. Secondary nodes cannot use the DRBD device while data is being replicated, and so the MySQL on the secondary node cannot be simultaneously active.
Cannot provide scalability, since secondary nodes don't have access to the secondary data.
Recommended uses
High availability situations where concurrent access to the data is not required, but instant access to the active data in the event of a system or hardware failure is required.
For information on configuring DRBD and configuring MySQL for use with a DRBD device, see Section 14.1, “Using MySQL with DRBD for High Availability”.
Heartbeat is a third party software solution for Linux. It is not a data replication or synchronization solution, but a solution for monitoring servers and switching active MySQL servers automatically in the event of failure. Heartbeat needs to be combined with MySQL Replication or DRBD to provide automatic failover.
The information and suitability of the various technologies and different scenarios is summarized in the table below.
| Requirements | MySQL Replication | MySQL Replication + Heartbeat | MySQL Heartbeat + DRBD | MySQL Cluster |
|---|---|---|---|---|
| Availability | ||||
| Automated IP failover | No | Yes | Yes | No |
| Automated database failover | No | No | Yes | Yes |
| Typical failover time | User/script-dependent | Varies | < 30 seconds | < 3 seconds |
| Automatic resynchronization of data | No | No | Yes | Yes |
| Geographic redundancy support | Yes | Yes | Yes, when combined with MySQL Replication | Yes, when combined with MySQL Replication |
| Scalability | ||||
| Built-in load balancing | No | No | No | Yes |
| Supports Read-intensive applications | Yes | Yes | Yes, when combined with MySQL Replication | Yes |
| Supports Write-intensive applications | No | No | Yes | Yes |
| Maximum number of nodes per group | One master, multiple slaves | One master, multiple slaves | One active (primary), multiple passive (secondary) nodes | 255 |
| Maximum number of slaves | Unlimited (reads only) | Unlimited (reads only) | Unlimited (reads only) | Unlimited (reads only) |
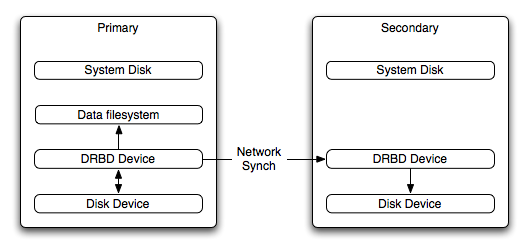
The Distributed Replicated Block Device (DRBD) is a Linux Kernel module that supports a distributed storage system. You can use DRBD to share block devices between Linux servers and, in turn, share filesystems and data.
DRBD implements a block device which can be used for storage and which is replicated from a primary server to one or more secondary servers. The distributed block device is handled by the DRBD service. Writes to the DRBD block device are distributed among the servers. Each DRBD service writes the information from the DRBD block device to a local physical block device (hard disk).
On the primary, for example, the data writes are written both to the underlying physical block device and distributed to the secondary DRBD services. On the secondary, the writes received through DRBD and written to the local physical block device. On both the primary and the secondary, reads from the DRBD block device are handled by the underlying physical block device. The information is shared between the primary DRBD server and the secondary DRBD server synchronously and at a block level, and this means that DRBD can be used in high-availability solutions where you need failover support.
When used with MySQL, DRBD can be used to ensure availability in the event of a failure. MySQL is configured to store information on the DRBD block device, with one server acting as the primary and a second machine available to operate as an immediate replacement in the event of a failure.
For automatic failover support you can combine DRBD with the Linux Heartbeat project, which will manage the interfaces on the two servers and automatically configure the secondary (passive) server to replace the primary (active) server in the event of a failure. You can also combine DRBD with MySQL Replication to provide both failover and scalability within your MySQL environment.
For information on how to configure DRBD and MySQL, including Heartbeat support, see Section 14.1.1, “Configuring a MySQL and DRBD Environment”.
An FAQ for using DRBD and MySQL is available. See Section A.14, “MySQL 5.0 FAQ — MySQL, DRBD, and Heartbeat”.
Note
Because DRBD is a Linux Kernel module it is currently not supported on platforms other than Linux.
To set up DRBD, MySQL and Heartbeat you need to follow a number of steps that affect the operating system, DRBD and your MySQL installation.
Before starting the installation process, you should be aware of the following information, terms and requirements on using DRBD:
DRBD is a solution for enabling high-availability, and therefore you need to ensure that the two machines within your DRBD setup are as identically configured as possible so that the secondary machine can act as a direct replacement for the primary machine in the event of system failure.
DRBD works through two (or more) servers, each called a node
The node that contains the primary data, has read/write access to the data, and in an HA environment is the currently active node is called the primary.
The server to which the data is replicated is designated as secondary.
A collection of nodes that are sharing information are referred to as a DRBD cluster.
For DRBD to operate you must have a block device on which the information can be stored on each DRBD node. The lower level block device can be a physical disk partition, a partition from a volume group or RAID device or any other block device.
Typically you use a spare partition on which the physical data will be stored . On the primary node, this disk will hold the raw data that you want replicated. On the secondary nodes, the disk will hold the data replicated to the secondary server by the DRBD service. Ideally, the size of the partition on the two DRBD servers should be identical, but this is not necessary as long as there is enough space to hold the data that you want distributed between the two servers.
For the distribution of data to work, DRBD is used to create a logical block device that uses the lower level block device for the actual storage of information. To store information on the distributed device, a filesystem is created on the DRBD logical block device.
When used with MySQL, once the filesystem has been created, you move the MySQL data directory (including InnoDB data files and binary logs) to the new filesystem.
When you set up the secondary DRBD server, you set up the physical block device and the DRBD logical block device that will store the data. The block device data is then copied from the primary to the secondary server.
The overview for the installation and configuration sequence is as follows:
First you need to set up your operating system and environment. This includes setting the correct hostname, updating the system and preparing the available packages and software required by DRBD, and configuring a physical block device to be used with the DRBD block device. See Section 14.1.1.1, “Setting up the Operating System”.
Installing DRBD requires installing or compiling the DRBD source code and then configuring the DRBD service to set up the block devices that will be shared. See Section 14.1.1.2, “Installing and Configuring DRBD”.
Once DRBD has been configured, you must alter the configuration and storage location of the MySQL data. See Section 14.1.1.3, “Configuring MySQL for DRBD”.
To set your Linux environment for using DRBD there are a number of system configuration steps that you must follow.
Make sure that the primary and secondary DRBD servers have the correct hostname, and that the hostnames are unique. You can verify this by using the uname command:
$ uname -n
drbd-master
If the hostname is not set correctly then edit the appropriate file (usually
/etc/sysconfig/networkor/etc/conf.d/hostname) and set the name correctly.Each DRBD node must have a unique IP address. Make sure that the IP address information is set correctly within the network configuration and that the hostname and IP address has been set correctly within the
/etc/hostsfile.Although you can rely on the DNS or NIS system for host resolving, in the event of a major network failure these services may not be available. If possible, add the IP address and hostname of each DRBD node into the /etc/hosts file for each machine. This will ensure that the node information can always be determined even if the DNS/NIS servers are unavailable.
As a general rule, the faster your network connection the better. Because the block device data is exchanged over the network, everything that will be written to the local disk on the DRBD primary will also be written to the network for distribution to the DRBD secondary.
You must have a spare disk or disk partition that you can use as the physical storage location for the DRBD data that will be replicated. You do not have to have a complete disk available, a partition on an existing disk is acceptable.
If the disk is unpartitioned, partition the disk using fdisk. Do not create a filesystem on the new partition.
Remember that you must have a physical disk available for the storage of the replicated information on each DRBD node. Ideally the partitions that will be used on each node should be of an identical size, although this is not strictly necessary. Do, however, ensure that the physical partition on the DRBD secondary is at least as big as the partitions on the DRBD primary node.
If possible, upgrade your system to the latest available Linux kernel for your distribution. Once the kernel has been installed, you must reboot to make the kernel active. To use DRBD you will also need to install the relevant kernel development and header files that are required for building kernel modules. Platform specification information for this is available later in this section.
Before you compile or install DRBD, you must make sure the following tools and files are in place:
Kernel header files
Kernel source files
GCC Compiler
glib 2flex
bison
Additionally, if you want to support secure communication between your DRBD nodes then the following items will be required:
OpenSSL
GNU TLS
GNU Crypt
Here are some operating system specific tips for setting up your installation:
Tips for Red Hat (including CentOS and Fedora):
Use up2date or yum to update and install the latest kernel and kernel header files:
# up2date kernel-smp-devel kernel-smp
Reboot. If you are going to build DRBD from source, then update your system with the required development packages
# up2date glib-devel openssl-devel libgcrypt-devel glib2-devel \
pkgconfig ncurses-devel rpm-build rpm-devel redhat-rpm-config gcc \
gcc-c++ bison flex gnutls-devel lm_sensors-devel net-snmp-devel \
python-devel bzip2-devel libselinux-devel perl-DBI
If you are going to use the pre-built DRBD RPMs:
# up2date gnutls lm_sensors net-snmp ncurses libgcrypt glib2 openssl glib
Tips for Debian, Ubuntu, Kubuntu:
Use apt-get to install the kernel packages
# apt-get install linux-headers linux-image-server
If you are going to use the pre-built Debian packages for DRBD then you should not need any additional packages.
If you want to build DRBD from source, you will need to use the following command to install the required components:
# apt-get install devscripts flex bison build-essential \
dpkg-dev kernel-package debconf-utils dpatch debhelper \
libnet1-dev e2fslibs-dev libglib2.0-dev automake1.9 \
libgnutls-dev libtool libltdl3 libltdl3-dev
Tips for Gentoo:
Gentoo is a source based Linux distribution and therefore many of the source files and components that you will need are either already installed or will be installed automatically by emerge.
To install DRBD 0.8.x, you must unmask the
sys-cluster/drbdbuild by adding the following line to/etc/portage/package.keywords:sys-cluster/drbd ~x86
If your kernel does not already have the userspace to kernelspace linker enabled, then you will need to add the following line to your kernel configuration (
/etc/kernels/kernel-config-*file):CONFIG_CONNECTOR=y
You can now emerge DRBD 0.8.x into your Gentoo installation:
# emerge drbd
To install DRBD you can choose either the pre-built binary installation packages or you can use the source packages and build from source. If you want to build from source you must have installed the source and development packages.
If you are installing using a binary distribution then you must ensure that the kernel version number of the binary package matches your currently active kernel. You can use uname to find out this information:
$ uname -r
2.6.20-gentoo-r6
To build from the sources, download the source
tar.gz package, extract the contents and then
follow the instructions within the INSTALL
file.
To install DRBD on Gentoo:
# emerge drbd
Note
Note that this may install an older version of the DRBD software. In this case you must install DRBD from the source tarball by hand.
Once DRBD has been configured and installed you must copy the
default DRBD configuration file from
/usr/share/
to drbd-0.7.23/drbd.conf.bz2/etc and then uncompress it using
bunzip2.
Once DRBD has been built and installed, you need to edit the
/etc/drbd.conf file and then run a number
of commands to build the block device and setup the replication.
Although the steps below are split into those for the primary node and the secondary node, it should be noted that the configuration files for all nodes should be identical, and many of the same steps have to be repeated on each node to enable the DRBD block device.
To set up a DRBD primary node you need to configure the DRBD service, create the first DRBD block device and then create a filesystem on the device so that you can store files and data.
The DRBD configuration file
(/etc/drbd.conf) defined a number of
parameters for your DRBD configuration, including the
frequency of updates and block sizes, security information and
the definition of the DRBD devices that you want to create.
The key elements to configure are the on
sections which specify the configuration of each node.
To follow the configuration, the sequence below shows only the
changes from the default drbd.conf file.
Configurations within the file can be both global or tied to
specific resource.
Set the synchronization rate between the two nodes. You should keep this in check compared to the speed of your network connection. Gigabit Ethernet can support up to 125 MB/second, 100Mbps Ethernet slightly less than a tenth of that (12MBps). If you are using a shared network connection, rather than a dedicated, then you should gauge accordingly.
To set the synchronization rate, edit the
ratesetting within thesyncerblock:syncer { rate 10M; }Set up some basic authentication. DRBD supports a simple password hash exchange mechanism. This helps to ensure that only those hosts with the same shared secret are able to join the DRBD node group.
cram-hmac-alg “sha1”; shared-secret "
shared-string";Now you must configure the host information. Remember that you must have the node information for the primary and secondary nodes in the
drbd.conffile on each host. You need to configure the following information for each node:device— the path of the logical block device that will be created by DRBD.disk— the block device that will be used to store the data.address— the IP address and port number of the host that will hold this DRBD device.meta-disk— the location where the metadata about the DRBD device will be stored. You can set this tointernaland DRBD will use the physical block device to store the information, by recording the metadata within the last sections of the disk. The exact size will depend on the size of the logical block device you have created, but it may involve up to 128MB.
A sample configuration for our primary server might look like this:
on drbd-master {
device /dev/drbd0;
disk /dev/hdd1;
address 192.168.0.240:8888;
meta-disk internal;
}
The
onconfiguration block should be repeated for the secondary node (and any further) nodes:on drbd-slave { device /dev/drbd0; disk /dev/hdd1; address 192.168.0.241:8888; meta-disk internal; }The IP address of eac
onblock must match the IP address of the corresponding host. Do not set this value to the IP address of the corresponding primary or secondary in each case.Before starting the primary node, you should create the metadata for the devices:
# drbdmeta create-md all
You are now ready to start DRBD:
# /etc/init.d/drbd start
DRBD should now start and initialize, creating the DRBD devices that you have configured.
DRBD creates a standard block device - to make it usable, you must create a filesystem on the block device just as you would with any standard disk partition. Before you can create the filesystem, you must mark the new device as the primary device (i.e. where the data will be written and stored), and and initialize the device. Because this is a destructive operation, you must specify the command line option to overwrite the raw data:
# drbdadm -- --overwrite-data-of-peer primary all
If you are using a version of DRBD earlier than 0.8.0, then you need to use a different command-line option:
# drbdadm -- --do-what-I-say primary all
Now create a filesystem using your chosen filesystem type:
# mkfs.ext3 /dev/drbd0
You can now mount the filesystem and if necessary copy files to the mount point:
# mkdir /mnt/drbd
# mount /dev/drbd0 /mnt/drbd
# echo "DRBD Device" >/mnt/drbd/samplefile
Your primary node is now ready to use. You should now configure your secondary node or nodes.
The configuration process for setting up a secondary node is the same as for the primary node, except that you do not have to create the filesystem on the secondary node device, as this information will automatically be transferred from the primary node.
To setup a secondary node:
Copy the
/etc/drbd.conffile from your primary node to your secondary node. It should already contain all the information and configuration that you need, since you had to specify the secondary node IP address and other information for the primary node configuration.Create the DRBD metadata on the underlying disk device:
# drbdmeta create-md all
Start DRBD:
# /etc/init.d/drbd start
Once DRBD has started, it will start the copy the data from the primary node to the secondary node. Even with an empty filesystem this will take some time, since DRBD is copying the block information from a block device, not simply copying the filesystem data.
You can monitor the progress of the copy between the primary
and secondary nodes by viewing the output of
/proc/drbd:
# cat /proc/drbd
version: 8.0.4 (api:86/proto:86)
SVN Revision: 2947 build by root@drbd-master, 2007-07-30 16:43:05
 0: cs:SyncSource st:Primary/Secondary ds:UpToDate/Inconsistent C r---
    ns:252284 nr:0 dw:0 dr:257280 al:0 bm:15 lo:0 pe:7 ua:157 ap:0
        [==>.................] sync'ed: 12.3% (1845088/2097152)K
        finish: 0:06:06 speed: 4,972 (4,580) K/sec
        resync: used:1/31 hits:15901 misses:16 starving:0 dirty:0 changed:16
        act_log: used:0/257 hits:0 misses:0 starving:0 dirty:0 changed:0
Once the primary and secondary machines are configured and
synchronized, you can get the status information about your
DRBD device by viewing the output from
/proc/drbd:
# cat /proc/drbd
version: 8.0.4 (api:86/proto:86)
SVN Revision: 2947 build by root@drbd-master, 2007-07-30 16:43:05
 0: cs:Connected st:Primary/Secondary ds:UpToDate/UpToDate C r---
    ns:2175704 nr:0 dw:99192 dr:2076641 al:33 bm:128 lo:0 pe:0 ua:0 ap:0
        resync: used:0/31 hits:134841 misses:135 starving:0 dirty:0 changed:135
        act_log: used:0/257 hits:24765 misses:33 starving:0 dirty:0 changed:33
The first line provides the version/revision and build information.
The second line starts the detailed status information for an individual resource. The individual field headings are as follows:
cs — connection state
st — node state (local/remote)
ld — local data consistency
ds — data consistency
ns — network send
nr — network receive
dw — disk write
dr — disk read
pe — pending (waiting for ack)
ua — unack'd (still need to send ack)
al — access log write count
In the previous example, the information shown indicates that the nodes are connected, the local node is the primary (because it is listed first), and the local and remote data is up to date with each other. The remainder of the information is statistical data about the device, and the data exchanged that kept the information up to date.
For administration, the main command is drbdadm. There are a number of commands supported by this tool the control the connectivity and status of the DRBD devices.
The most common commands are those to set the primary/secondary status of the local device. You can manually set this information for a number of reasons, including when you want to check the physical status of the secondary device (since you cannot mount a DRBD device in primary mode), or when you are temporarily moving the responsibility of keeping the data in check to a different machine (for example, during an upgrade or physical move of the normal primary node). You can set state of all local device to be the primary using this command:
# drbdadm primary all
Or switch the local device to be the secondary using:
# drbdadm secondary all
To change only a single DRBD resource, specify the resource
name instead of all.
You can temporarily disconnect the DRBD nodes:
# drbdadm disconnect all
Reconnect them using connect:
# drbdadm connect all
For other commands and help with drbdadm see the DRBD documentation.
Additional options you may want to configure:
protocol— specifies the level of consistency to be used when information is written to the block device. The option is similar in principle to theinnodb_flush_log_at_trx_commitoption within MySQL. Three levels are supported:A— data is considered written when the information reaches the TCP send buffer and the local physical disk. There is no guarantee that the data has been written to the remote server or the remote physical disk.B— data is considered written when the data has reached the local disk and the remote node's network buffer. The data has reached the remote server, but there is no guarantee it has reached the remote server's physical disk.C— data is considered written when the data has reached the local disk and the remote node's physical disk.
The preferred and recommended protocol is C, as it is the only protocol which ensures the consistency of the local and remote physical storage.
on-io-error— specifies what should happen when there is an error with the physical block device. Suitable values includepanic, which causes the node to leave the DRBD cluster by causing a kernel panic (and which would trigger automatic failover if you were using Heartbeat); anddetach, which switches DRBD into a diskless mode (that is, data is not written to the lower level block device).size— if you do not want to use the entire partition space with your DRBD block device then you can specify the size of the DRBD device to be created. The size specification can include a quantifier. For example, to set the maximum size of the DRBD partition to 1GB you would use:size 1G;
With the configuration file suitably configured and ready to use, you now need to populate the lower-level device with the metadata information, and then start the DRBD service.
Once you have configured DRBD and have an active DRBD device and filesystem, you can configure MySQL to use the chosen device to store the MySQL data.
When performing a new installation of MySQL, you can either select to install MySQL entirely onto the DRBD device, or just configure the data directory to be located on the new filesystem.
In either case, the files and installation must take place on the primary node, because that is the only DRBD node on which you can mount the DRBD device filesystem as read/write.
You should store the following files and information on your DRBD device:
MySQL data files, including the binary log, and InnoDB data files.
MySQL configuration file (
my.cnf).
To setup MySQL to use your new DRBD device and filesystem:
If you are migrating an existing MySQL installation, stop MySQL:
$ mysqladmin shutdown
Copy the
my.cnfonto the DRBD device. If you are not already using a configuration file, copy one of the sample configuration files from the MySQL distribution.# mkdir /mnt/drbd/mysql # cp /etc/my.cnf /mnt/drbd/mysql
Copy your MySQL data directory to the DRBD device and mounted filesystem.
# cp -R /var/lib/mysql /drbd/mysql/data
Edit the configuration file to reflect the change of directory by setting the value of the
datadiroption. If you have not already enabled the binary log, also set the value of thelog-binoption.datadir = /drbd/mysql/data log-bin = mysql-bin
Create a symbolic link from
/etc/my.cnfto the new configuration file on the DRBD device filesystem.# ln -s /drbd/mysql/my.cnf /etc/my.cnf
Now start MySQL and check that the data that you copied to the DRBD device filesystem is present.
# /etc/init.d/mysql start
Your MySQL data should now be located on the filesystem running on your DRBD device. The data will be physically stored on the underlying device that you configured for the DRBD device. Meanwhile, the content of your MySQL databases will be copied to the secondary DRBD node.
Note that you cannot access the information on your secondary node, as a DRBD device working in secondary mode is not available for use.